Monday, March 25, 2013

Shop Dwellings for Easter

 
Fill your Easter baskets at Dwellings in LeClaire!
The shop is filled with great Spring merchandise with fresh colors and textures.
Dwellings has all you need for the perfect Easter brunch table setting.
 
 
I adore the cement bunnies!
What a great modern take on Easter decor for your home.
The cement Easter bunnies are one of the hottest items for Easter!
Stop in to get yours soon!


Wednesday, March 20, 2013

Think Spring!

 
Nothing says Spring to me more than a fresh bouquet of Tulips!
I wish I could say that Spring is in the air, but unfortunately here in the Midwest,
Winter just won't go away!
 
I hope that you are welcoming Spring as much as I am this year!
Bring on the birds chirping, sunny days & warm weather!
I can't wait to start planting in our new yard it is in major need of some TLC.
 
Carrie


Saturday, March 16, 2013

Our Renovation - Interior Inspirations


I've really been working hard to make sure that I have a nice collection of inspiration images.
I believe it is a necessary part of the process during a renovation of any size.
Or even just a redocrating project.
When you see rooms that inspire you, they make you feel good, cozy and warm.
Giving you the feeling that you are home.
 
In order for you to feel the easy relaxed and casual feeling of home.
You have to surround yourself with things that you love.
I believe that the fabrics, colors and textures you bring into a home help soothe the soul.
 
 
You can see all of inpirations images on my Pinterest boards here.
I have also created a special board to help inspire the Corson Cottage Renovation.
You can follow that board here.
 
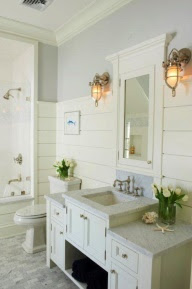
 image via Google Cottage Living
 
These images are a few of my favorites that I have collected over time.
Some of them, I pinned on Pinterest.
Truth be told I have actually saved old Cottage Living magazines for years also,
with some of these images in mind for one day when...
Finally that day has arrived!
It's almost starting to seem surreal.
 
 
We are currently making choices on flooring, paint, cabinets, counter tops, and lighting.
I want to make sure that the choices we make will all make sense.
I believe that a home should have a cohesive look and feel throughout the entire home.
I also think a home is a relection of you and your family.
A home should reflect your lifestyle and how you will live in your space.
Surround yourself with what makes you feel comfortable.
Make sure that the comforts of home are also functional for the way you live everyday.
 
 
Take the things you love about each photo or blog post that inspires you.
What is it that you really love about it?
Is the color, a texture a mood?
Those are the things to think about when planning your space.
Find a way to bring what you love from the things that inspire you into your home.
That is how you will create the home of your dreams.
Trust me when I say, this can be done on any budget.
 
 
I hope you see some things here that inspire you.
Hopefully you can see the look and feel I hope to create in our cottage home.
I may need some help choosing finishing options, so I would love your input in the posts to come.

I would love for you to follow me on Pinterest too.
Click here to see my Pinterest boards.
If you see something you think would be a great inspiration for our renovation, let me know.
I would love to see it!


 Have a great relaxing weekend!
Carrie


Sunday, March 10, 2013

Our Renovation - Drywall Finishing & Prepping for Paint

 
Immediately after Travis completed the drywall installation, the drywall finish began.
Mudding & taping the drywall was the one job of this entire project that we hired to be completed.
It is a skill that is best left for a professional.
We made that decision in the very beginning & never waivered one bit.
 
Mudding a taping can be a very tedious job.
If it is not done correctly it can ruin the walls in your home.
We thought it best to take no chances on this process.
It is also an extremely messy job.
So, we put resin paper down throughout the entire house to help with clean up.
It made it so much easier.
Tear up the paper.  Roll it up.  Throw it out.  Done.
 
 
The Mudding / Taping / Ceiling Finish took about 5-6 days overall.
They do a layer, let it dry, do a layer let it dry.
You get the point.


In the meantime it's time to choose paint colors & flooring!
They are up next on the list.


Saturday, March 9, 2013

Our Renovation Moves Inside - Drywall Installation & A Tour

January 2013

Welcome to the new & improved Corson Cottage!
Come on in!

March 2012
Remember when the entrance looked like this?
It's a getting a little better I would say, almost inviting even.
(Okay, maybe not just yet.  It will be eventually I promise!)
Our drywall installation was completed in January.
I thought this was a great reason to share an updated tour of our interior renovation progress.

For those of you who may not have seen some of our before photos,
you can see how far we have come by clicking here and here.

The Living Room

The Living Room is part of the original existing home structure.
It has a very similar layout,
other than we completely opened up the space to the kitchen and dining area.

The Kitchen

The kitchen area was completely changed. 
The original kitchen was only partially open to the living room.
It was a long galley kitchen style running along the same wall,
but on the right side there was a bathroom and the ceiling height was lower.
It was very dark with only two small windows.
We tore that part of the house off, it wasn't in good shape & looked strange.
Then we included about 2.5 feet or so of the kitchen into the addition we added on the back.
Which enabled us to have the ceiling height throughout the kitchen be 10 foot.
Also giving us the chance to have the group of 3 windows.

(All my idea..I'm totally taking credit here.  Ha!
 One of the best features of the house in my opinion!
And my Dream Kitchen Come True!)
Truth be told had Travis not discovered how strange the lower height of the
 back corner of the kitchen was during demolition,
it would have totally changed the kitchen layout & design.


Ultimately all of our planning ended up
giving us the opportunity to have a huge open kitchen perfect for entertaining.
Our dream kitchen!
You can see a peak here of the french doors that will eventually lead to
a deck and patio area that leading into our backyard.
It will extend our living area considerably to have a great indoor/outdoor flow.


The Kitchen Reverse View

As you can see we have a great open concept.
The opposite side of the kitchen will have a big dining space.
We decided to add this pantry closet to ensure adequate kitchen storage.
The plan for our kitchen cabinet layout with the 3 large windows,
is that we will not have traditional upper cabinets.
We wanted to be sure to leave ourselves enough kitchen storage.
So, we ultimately took a bit of square footage from the middle bedroom to allow for the pantry.

The door opening on the right leads to Bedroom 1.

Bedroom 1 / Our Office

Our Home is a 3 Bedroom / 2 Bath Home.
This is Bedroom 1. 

For now, we don't really have the need for 3 bedrooms.
So, we decided the bedroom on the front of the house would make a nice office.
This room has great natural light and it's directly off the living room.
Making the living room seem a bit larger.
I love to have tons of natural light in any room.
I think it will be especially nice here, where we are planning
 to have a set of french doors leading into the space.
Allowing the natural light from both rooms to flow into one another.

It will be a great functional and useable space.
Travis can use this space to possibly entertain potential clients.
I can use this space for my photography.
We can also use this room for additional seating if we are entertaining.
I had Travis hard wire the closet for our computer and printer.
So, we will be able to hide all those ugly cords.


On the other side of our kitchen pantry is a door leading to Bedroom 2,
and a small hallway leading to the Master Bedroom, Main Bath and Laundry.

Bedroom 2

This is the smallest of the three bedrooms.
This is also where the old house meets the new house.
That is the reason there is just the one window and it is shifted to one side.
We were not able to cut through the structural beems supporting the house
 that are in the middle of this exterior wall.
The hole in the floor is now gone.
They left the hole as easy access to the basement,
while they were completing the plumbing and electrical.

Small, but it would make a nice nursery, don't ya think?
It will be a guest bedroom for now.

The Master Bedroom

I apologize for the dark photos.
Often times I have to take my photos in the evening just after I got home from work.
It is not a great time of day for good lighting.

The Master Bedroom is fairly large, even though this photo doesn't really show it.
There is a small hall off to the left, a Master Bath, and walk in closet.

The Main Bath

For some reason I can't ever get a great angle in this bath.
It's a little small, maybe that is the reason.
I absolutely love this window.
Can't wait to start choosing bathroom tile and vanities.

The Kitchen / Living Room

Well, that concludes our tour during our renovatoin post drywall installation.
There is still clean up to continue with at every stage.
But, thank goodness each stage the cleaning gets easier and easier.

Stay tuned for cottage updates.
We will be choosing interior finishing options very soon!
Who wants to help decorate???


Saturday, March 2, 2013

Our Renovation - Granite Grey Exterior Siding

 
Certainteed Granite Grey
 
When I last posted about Our Renovation I left off with our siding options.
You can read more about our choices here.
Well, we chose Granite Grey.
 
When we decided that our budget determined we would be going with
Mainstreet Siding from Certainteed, I knew right away I wanted a shade of grey.
 
 
Travis started working on the siding in November.
Then....moved in inside to work on the mechanicals.
Plumbing, Electrical, Heating & Air.
So, it was a bit of a long winter.
As the mechanicals go in there is constant progress,
but it's not quit as exciting for me as the details of finishing.
 
 
So, when all the mechanicals were finally finished at the end of December, I was thrilled!
To say the least.
Then it was back to finishing siding & the FUN stuff.
Finishing the interiors are coming up next!
Now, we are getting to good stuff!
 
 
A quick peak of the front of the house before siding is complete.
I will share the finished photos soon.
It's a bit of a sloppy mess right now, in Iowa it's been snowing all week.
Can't wait for the weather to break to get my hands dirty in that front yard!
 
 
Carrie


LinkWithin

Related Posts Plugin for WordPress, Blogger...