Showing posts with label Our Renovation. Show all posts

Saturday, May 11, 2013

Our Renovation - Interior French Doors

 
I am so excited to see the progress finally come together on our Cottage Reno.
Travis installed our interior french doors this week.
I am in LOVE!!!
I think this is my new favorite feature of our new home.
 
Modern & Classic Cottage Charm
ahhh
 
I could hardly wait to share these because I was so extremely excited!
 
Have a great weekend!
 
Carrie


Saturday, May 4, 2013

Our Renovation - Grey Laminate Flooring


Our laminate floors have been installed throughout our home!
Now this is serious progress my friends.
Our little cottage renovation is finally starting to feel like a real home.
We are thrilled with our selection to say the least!
 
Yesterday, I showed you how we narrowed our flooring choices.
 
 
It was both Travis & my favorite.
I think it was really just what we were looking for.
 
The greige tone with a slight comfort texture to the wood offers a casual and comfortable feel.
It is also a bit more modern, while still having an elegant sophistication of a beach cottage.
It also reminds me a bit of a barnwood with the wood grain showing through.
 
I was originally a bit worried about choosing a grey floor, for fear that it was too trendy.
I have to tell you, I'm so glad I went with my gut on this one.
The floor actually has a grey and brown look that we love.
 
I would definitely say my plan for the design aesthetic is kind of
casual elegant beach house meets modern farmhouse.
I think this flooring captures that feel.


Travis did the flooring installation himself.
I would say overall it took about 4-5 days to install.
Keep in mind, he is not normally a flooring guy, and he did not put in full days on it.
 
 
Lucy has even given her seal of approval:)
 
Hope you all are having a great weekend!
 
 
participating


Our Renovation - Flooring Selection

 
We have narrowed down our flooring selections.
I think we visited every flooring showroom in town during our search for the perfect floor.
I picked up samples every where I could.
 
We looked mostly at hardwoods and laminates.
Ultimately we decided what would work best for our family and lifestyle was a laminate floor.
Reality is...we live in our home.
My husband is a rugged manly guy & his work boots can often be found at the front door.
To my dismay they even find their way through the house from time to time,
tracking in what is left of a hard days work.
Little Lucy's wet paws will inevidently come racing through after a rainy day potty break.
Yes, even I rushing because I've forgotten something will race back inside not removing my shoes.


Once we decided that laminate flooring was the direction we wanted to go,
we narrowed our selection to the six styles you see above.
We quickly eilmated two styles, simply because we didn't like the look.
We learned as much about laminate as we could about laminate.
I encourage you to ask the specialist in the flooring departments at each stop you make.
It always seems like you learn something new from each person.
They recommended a 12mm laminate for durability.
Laminate is also fairly easy to install, which was good for us because Travis is doing the install.
One thing to keep in mind some will come with a layer of pad attached and some do not.
If it does not, you will need to by a seperate pad to install under the floating floor.
You can pick the padding up at your local home improvement store.
 
We also took our samples home & deliberately tried to mark them up.
Even going so far as to scratch them with a key.
You will be surprised some will scratch immediately.
Others it didn't matter what we did, it didn't leave a mark on the surface.
We even went so far to drop water on the surface and let it sit.
 
It may seem crazy, but we wanted to be certain we made a good choice for our lifestyle.
 
 
Things to keep in mind for our design plan.
 
We plan for our laminate floor to run throughout the house,
except for the bathrooms and laundry,where there will be tile.
With an open concept design and all of our rooms being on one level,
I think keeping our flooring selection consistant and almost minimal
will help to create the clean fresh modern cottage feel throughout the home.
The flooring is also going to be in our kitchen.
My husband was a bit hesitant of putting anything wood or laminate in the kitchen.
But, I think with our open concept the flooring needs to be the same throughout.
 
Our Top Four Flooring Choices are as follows:
 
 
Style Synopsis:
Love the greige look of this style. 
Grey but still brown and even a hint of lighter wood tone.
I think it has a casual feel and maybe a little bit of a beachy vibe.
Looks like it may hide dirt and foot prints well.
Concern: Is grey trendy or classic, will it stand the test of time?
 
 
Style Synopsis:
A bit darker than the last.
The oak finish is a bit more classic.
I think this floor has an updated more elegant feel.
Concern: Is it too dark to mix with the other wood furniture in our home?
Will it feel like to many drastically different woods?
 
 
Style Synopsis:
A more traditional finish and color tone.
Very brown and almost redish wood.
Is that a scratch I see in the corner?
Has a nice feel to the touch.
Concern: Is it too red?


Blonde and beachy.
A ligther option than the others this also has a casual feel.
Almost barn wood like.
Concern: Is it too light?

Another tip about buying flooring.
Many places the more you buy, the more you save.
Please note the pricing above is reflective of the sqaure footage we planned to order.
We ordered a total of 1300+ Sq. Ft., giving us the best level price break.


Which one do you think is right for us?
Which style would you choose?
I would love to hear your feedback.

 
Well, we have made our choice.
Good news, the flooring has already arrived.
Stay tuned for our final flooring decision tomorrow.
 
 
Also, I will still post more about our trim selection too.
 Want to see more of Our Renovation?
Click here to see how far we have come and check out our floor plan.
Carrie


Tuesday, April 30, 2013

Our Renovation - A Fresh Coat of White Interior Paint

 
As I shared over the weekend, we have been moving full speed ahead on our reno!
Unfortunately for my blog friends, you are a bit behind due our internet issues.
I apologize, but will do my best to cath you up soon.
 
For those of you who have followed The Corson Cottage for a while,
you may recall how much I loved
the renovation of our 4 season room at Our First House.
It was all white.
White Walls, White Trim, White Washed Painted Wood Floors.
LOVE, LOVE, LOVE!
 
When it came to our new home, I knew from the beginning,
(like before we even had walls to consider painting:)
that choosing paint color would be an easy decision.
 
White Painted Walls & Trim.
Everywhere.
Throughout the entire home.
I want our home to have a modern cottage feel.
 
Come to find out...
Selecting the perfect white paint, can be just a bit more challenging than you think.
 
Here's where we started.
 
Option 1
 
As much as I adore Simply White by Benjamin Moore,
it is a very popular white paint for a cottage style home.
At $65-70 per gallon, well it simply wasn't in our budget.
 
Option 2
 
At $130 per 5 Gallon Container, this was a contender.
I am extremely partial to Behr paint.
I've used it on several projects and it always ends up being my favorite.
I think Behr offers a great paint, at an affordable price and great coverage.
 
Option 3
 
At just $81.87 per 5 Gallon Container,
 Olympic Ultra White available at Lowes seemed to offer yet another good option.
A good paint brand at a good price point.
 Ultimately we decided to save a little money here & go with Olympic.
Every little bit helps and it stretches the budget in other areas
when you are working on a project of this magnitude.
 
Originally we planned to paint the entire house ourselves.
Well as our timeline sretched, so did our patience a bit.
We decided to have our drywall finishers paint the walls also.
They gave us a price that we couldn't refuse & our walls were all painted in about 4 days.
Priceless.


If there is one thing that I personally have learned a thing or two about
over the course of our fixer upper and renovation journies, it's paint.
I have painted nearly every single room and trim in every home we have lived in.
Travis is the builder & I am the painter.
He normally does the tough stuff & I handle the more delicate details.
 
{Tips}
So, here is my word of advice when selecting white paints.
 
 
1. My personal go to all time Favorite is Behr Ultra White.
I happen to love a bright crisp white.
I have found that the best white paint is the ultra white paint straight out
of the white paint container of most brands.
 
2. Still not sure, want to check it out for yourself.
Select a variety of white paint samples.
Take them home to the room you intend to paint.
I always start by eliminating those that are just all wrong.
 
3. Narrow your choice down to 2-3.
 
4. Paint a sample area on a wall or a seperate extra piece of wood in the room you're painting.
 
5. Choose your perfect shade of white & the perfect finish for the look you are trying to achieve.
 
 Still interested in hearing more about how to select the perfect white paint?
Stay tuned for our next post.
We'll go over how to select your perfect paint for trim.
 
Carrie
 
participating

Saturday, March 16, 2013

Our Renovation - Interior Inspirations


I've really been working hard to make sure that I have a nice collection of inspiration images.
I believe it is a necessary part of the process during a renovation of any size.
Or even just a redocrating project.
When you see rooms that inspire you, they make you feel good, cozy and warm.
Giving you the feeling that you are home.
 
In order for you to feel the easy relaxed and casual feeling of home.
You have to surround yourself with things that you love.
I believe that the fabrics, colors and textures you bring into a home help soothe the soul.
 
 
You can see all of inpirations images on my Pinterest boards here.
I have also created a special board to help inspire the Corson Cottage Renovation.
You can follow that board here.
 
 image via Google Cottage Living
 
These images are a few of my favorites that I have collected over time.
Some of them, I pinned on Pinterest.
Truth be told I have actually saved old Cottage Living magazines for years also,
with some of these images in mind for one day when...
Finally that day has arrived!
It's almost starting to seem surreal.
 
 
We are currently making choices on flooring, paint, cabinets, counter tops, and lighting.
I want to make sure that the choices we make will all make sense.
I believe that a home should have a cohesive look and feel throughout the entire home.
I also think a home is a relection of you and your family.
A home should reflect your lifestyle and how you will live in your space.
Surround yourself with what makes you feel comfortable.
Make sure that the comforts of home are also functional for the way you live everyday.
 
 
Take the things you love about each photo or blog post that inspires you.
What is it that you really love about it?
Is the color, a texture a mood?
Those are the things to think about when planning your space.
Find a way to bring what you love from the things that inspire you into your home.
That is how you will create the home of your dreams.
Trust me when I say, this can be done on any budget.
 
 
I hope you see some things here that inspire you.
Hopefully you can see the look and feel I hope to create in our cottage home.
I may need some help choosing finishing options, so I would love your input in the posts to come.

I would love for you to follow me on Pinterest too.
Click here to see my Pinterest boards.
If you see something you think would be a great inspiration for our renovation, let me know.
I would love to see it!


 Have a great relaxing weekend!
Carrie


Sunday, March 10, 2013

Our Renovation - Drywall Finishing & Prepping for Paint

 
Immediately after Travis completed the drywall installation, the drywall finish began.
Mudding & taping the drywall was the one job of this entire project that we hired to be completed.
It is a skill that is best left for a professional.
We made that decision in the very beginning & never waivered one bit.
 
Mudding a taping can be a very tedious job.
If it is not done correctly it can ruin the walls in your home.
We thought it best to take no chances on this process.
It is also an extremely messy job.
So, we put resin paper down throughout the entire house to help with clean up.
It made it so much easier.
Tear up the paper.  Roll it up.  Throw it out.  Done.
 
 
The Mudding / Taping / Ceiling Finish took about 5-6 days overall.
They do a layer, let it dry, do a layer let it dry.
You get the point.


In the meantime it's time to choose paint colors & flooring!
They are up next on the list.


Saturday, March 9, 2013

Our Renovation Moves Inside - Drywall Installation & A Tour

January 2013

Welcome to the new & improved Corson Cottage!
Come on in!

March 2012
Remember when the entrance looked like this?
It's a getting a little better I would say, almost inviting even.
(Okay, maybe not just yet.  It will be eventually I promise!)
Our drywall installation was completed in January.
I thought this was a great reason to share an updated tour of our interior renovation progress.

For those of you who may not have seen some of our before photos,
you can see how far we have come by clicking here and here.

The Living Room

The Living Room is part of the original existing home structure.
It has a very similar layout,
other than we completely opened up the space to the kitchen and dining area.
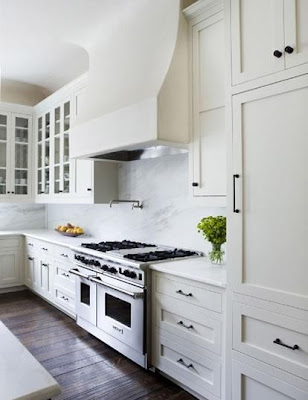
The Kitchen

The kitchen area was completely changed. 
The original kitchen was only partially open to the living room.
It was a long galley kitchen style running along the same wall,
but on the right side there was a bathroom and the ceiling height was lower.
It was very dark with only two small windows.
We tore that part of the house off, it wasn't in good shape & looked strange.
Then we included about 2.5 feet or so of the kitchen into the addition we added on the back.
Which enabled us to have the ceiling height throughout the kitchen be 10 foot.
Also giving us the chance to have the group of 3 windows.

(All my idea..I'm totally taking credit here.  Ha!
 One of the best features of the house in my opinion!
And my Dream Kitchen Come True!)
Truth be told had Travis not discovered how strange the lower height of the
 back corner of the kitchen was during demolition,
it would have totally changed the kitchen layout & design.


Ultimately all of our planning ended up
giving us the opportunity to have a huge open kitchen perfect for entertaining.
Our dream kitchen!
You can see a peak here of the french doors that will eventually lead to
a deck and patio area that leading into our backyard.
It will extend our living area considerably to have a great indoor/outdoor flow.


The Kitchen Reverse View

As you can see we have a great open concept.
The opposite side of the kitchen will have a big dining space.
We decided to add this pantry closet to ensure adequate kitchen storage.
The plan for our kitchen cabinet layout with the 3 large windows,
is that we will not have traditional upper cabinets.
We wanted to be sure to leave ourselves enough kitchen storage.
So, we ultimately took a bit of square footage from the middle bedroom to allow for the pantry.

The door opening on the right leads to Bedroom 1.

Bedroom 1 / Our Office

Our Home is a 3 Bedroom / 2 Bath Home.
This is Bedroom 1. 

For now, we don't really have the need for 3 bedrooms.
So, we decided the bedroom on the front of the house would make a nice office.
This room has great natural light and it's directly off the living room.
Making the living room seem a bit larger.
I love to have tons of natural light in any room.
I think it will be especially nice here, where we are planning
 to have a set of french doors leading into the space.
Allowing the natural light from both rooms to flow into one another.

It will be a great functional and useable space.
Travis can use this space to possibly entertain potential clients.
I can use this space for my photography.
We can also use this room for additional seating if we are entertaining.
I had Travis hard wire the closet for our computer and printer.
So, we will be able to hide all those ugly cords.


On the other side of our kitchen pantry is a door leading to Bedroom 2,
and a small hallway leading to the Master Bedroom, Main Bath and Laundry.

Bedroom 2

This is the smallest of the three bedrooms.
This is also where the old house meets the new house.
That is the reason there is just the one window and it is shifted to one side.
We were not able to cut through the structural beems supporting the house
 that are in the middle of this exterior wall.
The hole in the floor is now gone.
They left the hole as easy access to the basement,
while they were completing the plumbing and electrical.

Small, but it would make a nice nursery, don't ya think?
It will be a guest bedroom for now.

The Master Bedroom

I apologize for the dark photos.
Often times I have to take my photos in the evening just after I got home from work.
It is not a great time of day for good lighting.

The Master Bedroom is fairly large, even though this photo doesn't really show it.
There is a small hall off to the left, a Master Bath, and walk in closet.
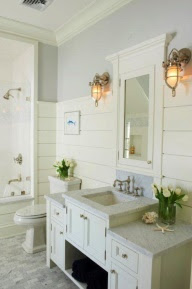
The Main Bath

For some reason I can't ever get a great angle in this bath.
It's a little small, maybe that is the reason.
I absolutely love this window.
Can't wait to start choosing bathroom tile and vanities.

The Kitchen / Living Room

Well, that concludes our tour during our renovatoin post drywall installation.
There is still clean up to continue with at every stage.
But, thank goodness each stage the cleaning gets easier and easier.

Stay tuned for cottage updates.
We will be choosing interior finishing options very soon!
Who wants to help decorate???


Saturday, March 2, 2013

Our Renovation - Granite Grey Exterior Siding

 
Certainteed Granite Grey
 
When I last posted about Our Renovation I left off with our siding options.
You can read more about our choices here.
Well, we chose Granite Grey.
 
When we decided that our budget determined we would be going with
Mainstreet Siding from Certainteed, I knew right away I wanted a shade of grey.
 
 
Travis started working on the siding in November.
Then....moved in inside to work on the mechanicals.
Plumbing, Electrical, Heating & Air.
So, it was a bit of a long winter.
As the mechanicals go in there is constant progress,
but it's not quit as exciting for me as the details of finishing.
 
 
So, when all the mechanicals were finally finished at the end of December, I was thrilled!
To say the least.
Then it was back to finishing siding & the FUN stuff.
Finishing the interiors are coming up next!
Now, we are getting to good stuff!
 
 
A quick peak of the front of the house before siding is complete.
I will share the finished photos soon.
It's a bit of a sloppy mess right now, in Iowa it's been snowing all week.
Can't wait for the weather to break to get my hands dirty in that front yard!
 
 
Carrie


Monday, November 5, 2012

Our Renovation ~ Choosing Exterior Siding Part 2

 
If you guessed that we selected the Certainteed Mainstreet Double 4" Vinyl Siding, you were correct.
This is the exterior siding material choice we have gone with on our home.
  If you haven't checked out Part 1 of Choosing Exterior Siding click here for a Reno catch up.
 
As I stated in Part 1, choosing siding pretty much all came down to budget.
I will admit, I was just a lil bit disappointed.
If you read my first post about choosing siding, you know this wasn't necessarily my top pick.
I knew all along, it may come down to this, but I am an optimist, so I held out hope:)
Don't get me wrong, I most certainly do not want to sound ungrateful,
I truly am absolutely thrilled with how our home is turning out!!!
 
But, when you realize this may be the only time you get to make these decisions, you want to make absolutely sure the choices you make for your home will stand the test of time.
I want our home to have an exterior modern & timeless cottage feel.
I know that aesthetic would have been best captured by
 more natural material or more natural looking materials.
 
A little Renovation Reality...
YOU WILL MAKE COMPRISES
BUDGET IS THE BUDGET
Don't get me wrong, we have gone over on some things & came in under on others.
But, for us sticking to our budget is a must in the end.
It's also part of what we originally set out to do.
Make the home of our dreams on a budget & that is exactly what we are doing!
 
We may still add some character and dimension in the gables on the front of our home.
But, just as I have to wait & see on that one so do you!  Ha:)
 
 
So, now that the big siding decision is out of the way it's on to the fun stuff!
Time to choose a siding color.
Wanna help?
 
We have it narrowed down to three options.
 
1. Granite Gray
2. Flagstone
3. Pacific Blue
 
{Views from the Outside}
 
 
1. Granite Gray


2. Flagstone
 

3. Pacific Blue
 
Our Home Renovation
(The porch is still coming off & the upper windows to be replaced.)
 
 
Well...what do ya think???
 
Whats' your favorite?
Which would you pick?
Which would you pick for us?
 
 
Want to see more of Our Cottage Renovation click here.
 participating

LinkWithin

Related Posts Plugin for WordPress, Blogger...